Sunday, September 30, 2012

A Cute Toy Block Saying

My Facebook Saying Inspiration

One of my Friends on Facebook posted the cutest little saying about a week ago....
It said...
* Got up this morning and ran around *
the block 4 times! then I got tired,
so I picked it up and put it back in
the toy box!

I just couldn't help but laugh at what it said...
That was the first time I'd heard that saying,
and then a lightbulb went off in my head...
So I just had to comment back at her
Charlotte: LOL! This would make a great sign for a big Block...
Her reply was : OMGosh Tania!!! It would!!! LOL

So Charlotte as promised this one is for you my dear....


I used some scrap pine and cut them 
2 pieces 5 1/2 x 5 1/5 for the front and back,... 
2 pieces 5 1/2 x4, for the sides.. 
and 2 pieces 4 x 4 for the top and bottom...
Using my brad nailer gun I joined all the pieces together
Then I sanded the whole block to make it flush and smooth...
I wanted to make it look like an actual toy block so I added some lattice strip where I was going to add the letters, but the lattice was a little wide so I ran it through my table saw and made the thickness 1 inch so it covered the edges of the wood when I joined it together.
Once I had finished making the block it was now time to paint it.
I painted the entire block white and then painted the trim around the edges in the primary colours, Red, Yellow, Green and Blue and then using some paper stencils that I had purchased from Walmart stenciled them in the center of each colour trim...
After painting the blocks letters I then needed to put the saying on the front...
I used my Silhouette SD and chose the font that I thought would look good for the block and resized it to fit the front of the block...
once I got the correct size I then chose the fill with colour option and chose Black.
I then printed it onto some card stock and cut to size using my Fiskars Card Cutter...
After it was cut to size I gave it an antique look and glue it to the block...
I then took the block and distressed all the edges giving it an aged look, and then rubbed some stain over areas of the block to make it aged even more... and then the last step was to give it a clear coat over the entire block...
And there you have it 
My finished toy block to run around in the mornings LOL!


Cheers! And thank You for stopping by♥
Feel free to leave me a Comment if you like my Block...  :^)

signature

Wednesday, September 26, 2012

DOZEY TRAINSPOTTER


This "trainspotters," as the British refer to as railroad enthusiasts  was filming the Arrival of the Oliver Cromwell, an old steam engine train at Thurston Station in the U.K.
When he failed to spot the speeding train coming from the other direction...

Watch the video and don't take your eyes away from the screen for a second... you will also hear the scream from a concerned bystander... so listen closely...


The Story and facts that I have written were originally found on Tom Cullen's page


Whew Now he was Lucky♥

signature

Tuesday, September 25, 2012

The Cabinets I Made For The Senior Citizens Club♥


So I finally finished the big project I was working on for ever....
One of the ladies from Senior life here in town approached me after finding out that I may have made a few cabinets here and there...(It was actually My Husband that volunteered me LOL!)
So I met her at the Senior Citizens Club up town to find out exactly what she needed me to make...

With note pad and pencil in hand I meet her there and we went over some ideas for a few cabinets ..... She told me that she was doing this to help them out in the club because the Hall where they play bingo and the gentlemen enjoy a fun game of Pool is rented out to the public over the weekends and when they return to the Hall on Mondays some of their property has been broken due to the kids being unattended and playing with all the Clubs merchandise.... I was told that they have gone through 3 microphones that they use when they call out the bingo numbers and use for meetings and some of the other stuff they have is also being damaged.. HOW SAD!.:'(

So  I drew up some Rough sketches and then when I got home transferred my ideas on some graph paper to scale and figured up all the material That I would need for the job
Here is my Design that I drew up to give you an example of how big these beauties were going to be...
6Ft high x 4Ft wide x 16" deep

LOL! It looks like it's been through a lot HUH!

AND THIS IS WHAT THEY ENDED UP LOOKING LIKE WHEN THEY WERE FINISHED WITH A FEW MODIFICATION HERE AND THERE♥
3 Cabinets with locks on them so they can lock up all their stuff over the weekends so Nothing gets broken anymore or goes missing and they are all keyed alike so they don't have to go searching for a bunch of different keys to unlock them.:)... The Cabinets on the Right has the opening at the top to put a 32" flat screen TV in it that "Senior Life at the Hospital had a bake Sale for and raised the Money... The Senior Citizen are going to be so happy when she turns up with that big boy..:)


So here is a few of the photos that I took while Building these cabinets....
Here is how I attached the cabinet together using my Kreg Jig ....I just love this little tool♥
It saved me a lot of time..I so wish I had this baby the last time I made some Cabinets..


Here are the cabinets all put together


The Doors were made out of Birch and I used screen moulding to give a decorative design so they didn't look so plain


The moulding I used on the bottom of the cabinet


And some more decorative moulding to jazz up the top


 Here is how I attached the hinges to the doors that I made out of Birch Wood
Making the doors myself kept the cost down on the cabinet since it was going to cost a lot more money to have them custom made...


I then Stained the cabinets with Early American Stain


Here they are all stained ...Don't they look pretty so far..:)♥


Now to put them all together and then add the locks and Handles.....

Here is how I installed the locks


Once I got done putting the locks on I drilled the holes for the handles and attached them too.


The backs were the last thing that I had to put on... They were stained and cut to size and attached using my staple air gun


I Just got all the Backs Cut and it Started to look real stormy outside so I packed everything up and  waited til it past before I went back out to finish....


YIKES! Look at that sky

So the storm past and I finished putting the backs on... By this time I was pooped It was late and I was glad that it was done..... Tomorrow we get to deliver them...
Don't they look PRETTY♥


Ah there's my Big Strong Boys to help me Deliver Them... What a handsome bunch of Blokes they are... The really good lookin one Standing on the Ground is Hubby and the other 2 Handsome Blokes are the guys he works with....
How nice it was of them to volunteer to deliver them for me..:)


Ready To deliver...Hope they like them...;)


And here they are Delivered to the Senior Citizens Club....
Wooo Hooo I got nothing but compliments and they loved them...:)


Well That's it Folks another successful Good Deed Done!
Remember to always be Very respectful to your elders Cause they deserve it..:)
God Bless!♥
Thank you for visiting  please feel free to Comment or Just smile after you leave this Blog.:)

signature

Sunday, September 16, 2012

How to make Yummy Smores..:)♥

So We went Camping this weekend and because the weather is getting so Cool now we decided to make a nice Campfire to sit by...
My Hubby and I just Love Camping and the outdoors and we try to go every chance we can...
And Friday was His Birthday so it was a great weekend to do it..
Not to mention my twin girls love it also and they are at the age right now where they enjoy riding their bikes and finding new friends to mingle with.
We are going to try and go still every  chance we can get cause this is the best time to sit outside and relax and enjoy the beautiful outdoors until it gets too cold and the snow starts to fall.

So I thought I would make a little Video for all of you to enjoy..
One of My twin girls "Katelyn" asked if she could be the Star in this little slap together clip...
So I told her Well Yes of course she could...
There is also a sneak peak of the campground host in there some where..
Just cause he wanted a piece of the action too LOL!
So Here it is ...
HOW TO MAKE YUMMY SMORES!
 
signature

Monday, August 6, 2012

Pretty Dragonfly♥

DRAGONFLIES♥

Common Whitetail Dragonfly!

So today I was outside in the yard and I was doing some well needed Yard Work
Watering the plants, mowing the yard, picking up falling branches and was just getting ready to go sweep out the garage when out of the corner of my eye I noticed something White... at first I didn't know what it was but then the little fella got curious and came back and landed right in front of me....
He or She Not sure how you can tell LOL! circled me quite often I think it might of been checking me out...
It hung around for some time...and every time I moved it moved with me...
Was it stalking Me????
So I thought to myself if you are going to be this Brave I'm going to try to take a picture of you...
I just happened to have my camera outside cause I had just finished taking some pictures of my flower garden so I grabbed my camera and walked up to it very slowly...
At first it flew away but then came back real quick..I started clicking away but it was still too far away and I wanted to get a better picture of him/her... I zoomed in a couple of time but the pictures still weren't that clear...
After about 40 or so pics that didn't turn out real good I started to give up and then the perfect shot came in range.. I think it was taunting me LOL!.. After 66 clicks of my Camera I think we finally bonded and he/she became very photogenic I'm pretty sure it was actually posing for the picture..:)
I ended up getting so close to it that the camera lense was almost touching it..

Here are the shots I got

Not So sure of me????


 Getting more comfortable with me


and a little more :)


 I think it's warming up to me...


 We are starting to bond


 I think we finally bonded♥


Dragonflies are beautiful aren't they♥

signature

Friday, August 3, 2012

A Chicken Coop Cabinet Restored...

This one was a challenge for me and if you know me I have a hard time saying NO to any project anyone puts in front of me... So here we go.....
I got a phone call from one of my wonderful neighbours who lives 2 doors across the street  from me wanting to know if I wanted to refinish a cabinet for a 90 Year Old Lady...
Well of course even before she gave me all the details I said yes.
BIG MISTAKE( I'll Explain )...
Never say yes until you actually set eye on whatever you are supposed to be restoring...
Anyway..
I decided to take on the challenge and this is what I did.
HERE IS THE CABINET THAT THEY WANTED ME TO REFINISH!
It had been at rest for over 50 years they told me in a chicken coop...
The weather and Chickens had really done a number on this beauty. :'(


Something had been eating away at the top
Maybe it was those Chickens LOL!


The wood trim holding the old rippled glass in was almost all rotted away


The inside shelves were stained real bad.. 
The bottom shelf looks like it had some kind of can on it that leaked on the shelf and left a big nasty stain


The hardware was so rusted I had to scrape out the debri in the screw slots just so I could get my screwdriver in to take them out..


Most of them were so bad The just pulled right out of the wood
and it was so rusted the hardware wasn't working at this point.


Ahhhh! and then you have the back...
Not sure if that is Chicken Poop or Mud dobbers???
Not to worry! Back is coming off and going in the burn pile,
NO salvaging that part...


Not sure how it made it but the Original glass was still in tact
What a relief. =)


SO NOW FOR THE TRANSFORMATION!


First I sanded
Wearing my trusty Ventilated mask of course, cause you just don't know what particles will be flying around in the air...SAFETY FIRST!.=)


All the hardware and Screws went into a Jar of Lime A-Way
This has always worked well for me in the past on those nasty rusted objects


I let them sit for about 2 days and then with Rubber gloves removed them and used a very fine grit steel wool to remove any left over rust deposits left behind.


I had to stop sanding in some areas because of these little marks appearing in the wood 
someone said they are worm holes


I called the person I was re doing this for and they said to leave it it adds character to the piece
Which I agree so I left it and clear coated over it
Mind you the wood was so dry that the clear coat just sucked itself into the wood as soon as I applied it so I had to re coat a few times.


The Top was also very messed up but once again they didn't want me to fix this either..
It had a lot of water damage and looks like the worms were having a BIG feast.


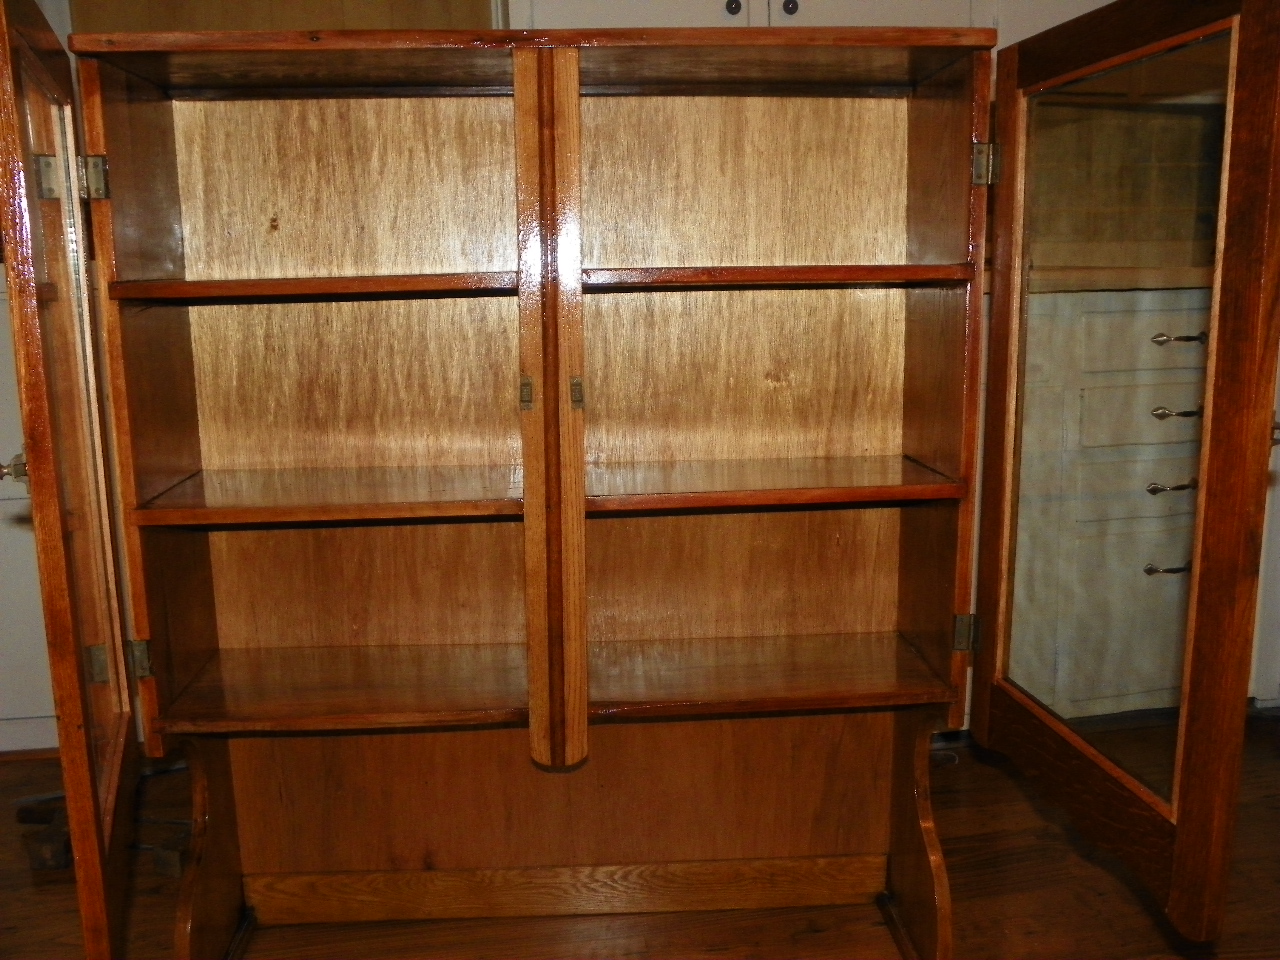
Look at the different colors in the wood on the shelves
I just love this.=)


I replaced all the trim work to hold the glass in place cause there was really nothing left of the old 
and I needed something to hold the old glass in place
From this angle you can almost see the ripples in the glass 
How beautiful!


I then added the back
I used 1/4" Luan


Put the hardware back on
Look how much cleaner they look
I added a little 3-in-One Household Oil which
(lubricates,cleans,polishes and prevents rust and tarnish)
to the hinges and door locks.


And they work perfectly now =)


I just love the scrolled pattern at the bottom of these doors 
SO PRETTY!


That Glass is just amazing ♥


AND THERE YOU HAVE IT!
That nasty chicken coop cabinet restored and ready to be hung once again hopefully for another 100 years or so..;)


The Old Lady absolutely Loves her new cabinet
Which makes me feel great...
But I have to say this was one of my biggest challenges yet and I don't think I will be doing another one of these any time soon...
Well You just never know wink! wink! ...
I'm such a glutton for punishment LOL!
Cheers♥
Thanks for stopping by and

Feel free to comment I read all of them..=)


signature