
I have always wanted a Bigger Table
and I have seen so many pictures in Magazines of beautiful Long banquet tables
Decorated Up for the Holidays and imagined
~HOW WONDERFUL THAT WOULD LOOK IN MY HOME~
So a couple of years ago I attempted to make a table and I got it finished Just in time for
My Twin Girls 6th ~BIRTHDAY~
It also Came in Handy for ~CHRISTMAS~ that year.
THIS IS WHAT IT LOOKED LIKE...
Keep reading and you'll see It's Transformation...

Yes I know you are all saying It looked nice and all
but I wasn't happy with it's sturdiness so I retired it into the Garage until
I figured out a solution and replaced it with the smaller table I had there before...
Well this year 2012 I decided I wanted to tackle the long table again since we were having quite a few people (FAMILY & FRIENDS) over this Year for
~THANKSGIVING~
So The Table came out of retirement so come join me in the Transformation of this table
So Here is what I started with the FIRST TIME ROUND

The top of the table was made with four 8ft x 10" boards cut down to 80"
The boards are actual size 9 1/4" so the width of the table came out to 37" wide
The underneath of the table was joined with 4" boards
Screwed to keep all the boards together
You could use a BISCUIT CUTTER and biscuits in this process too,
or you could also Dowel pin them together.
I did it this way and it is just as effective

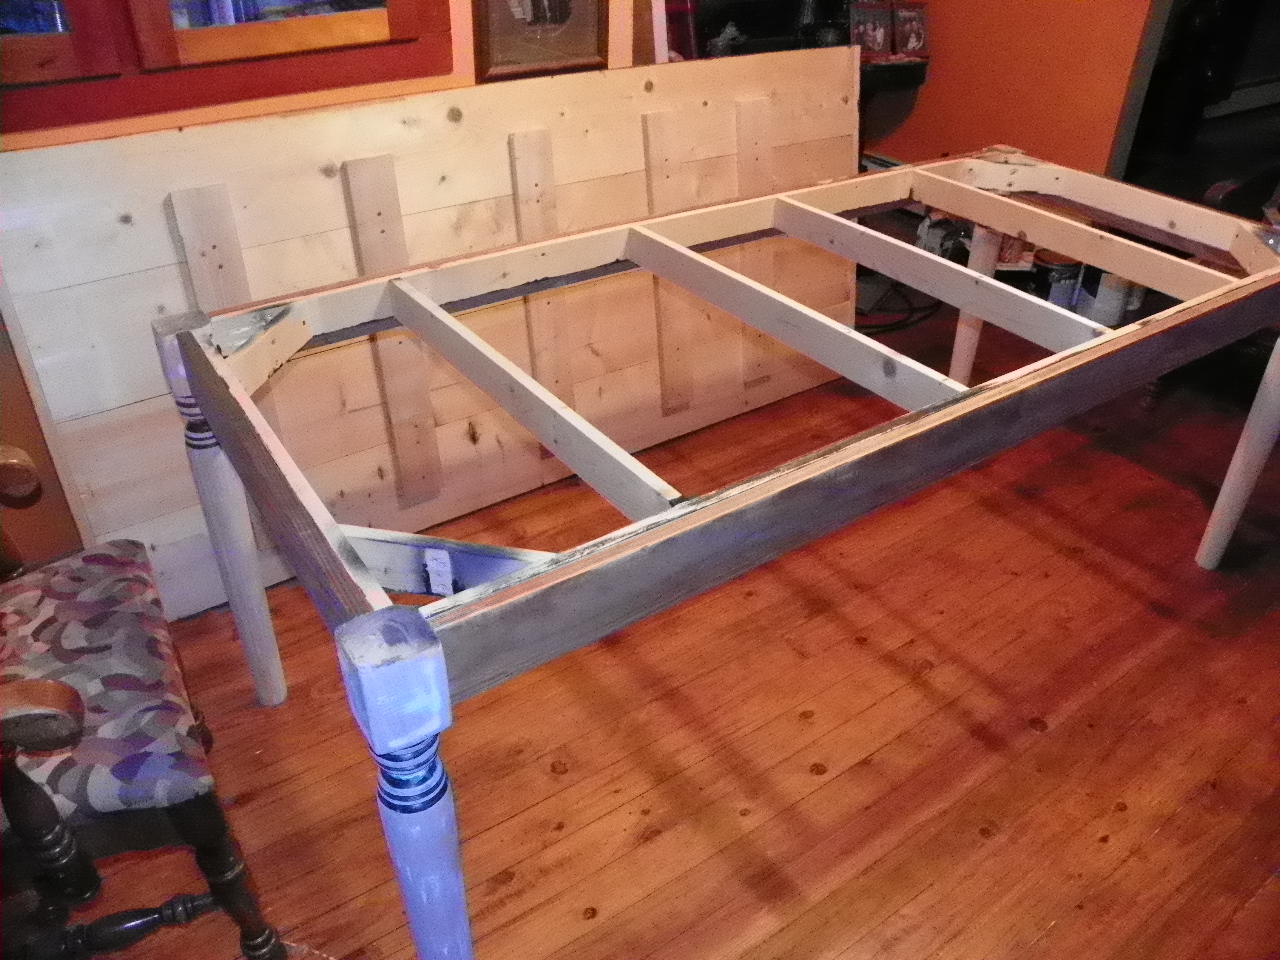
The Frame as you see in the 1st picture has the legs attached to the inside of the frame... I think this is where I may have gone wrong on my First attempt so I took the frame apart and re did it.
Starting with the legs I sanded them down since I had painted them black and did not prime them the first time "NAUGHTY ME"
UGH! 1 DOWN 3 MORE TO GO!!!!

LOOK AT ALL THOSE LAYERS OF PAINT!!!

WELL THIS WILL HAVE TO DO SINCE I AM GOING TO PAINT THEM AGAIN AND I AM NOT GOING TO TRY AND GET THE PAINT OUT OF THE CRACKS!!!

The legs Were then reattached to the Frame... This time I attached them on the outside of the frame instead of the inside of the frame and used my trusty KREG JIG to attach them.
I ♥ MY KREG!!!!

Once I had the legs attached I used some FREE scrap wood that I had Lying around....My Friends Bring me FREE wood all the time I just love it and I have loads of it.:))))
So I cut it to size and then attached it to the outside of the frame to give it more stability and also I wanted to make the frame SKIRT wider...
~SHE NO LONGER HAS A MINI SKIRT LOL!~


So here IT is Ready to paint!!!
I RECRUITED MY GIRLS TO HELP ME PRIME & PAINT...
The Chairs and the base of the Table.
WHAT GOOD LITTLE HELPERS THEY ARE..♥ :^)

And here is the
BEFORE AND AFTER PIC
of the Chair
Isn't she PRETTY?

Now that the Table and Chairs are painted I needed some more seating so I decided to make a BENCH! for the other side of the table since sometimes it hard to get in out because it is up against the WALL....
So I started with some more Scraps of wood that I had lying around...
and made a base
I cut 3 pieces of 1 1/2 "thick x 9" wide to the length of 16" for the legs and cut a V in the bottom with my Jig Saw for some decorative appeal...

I then cut two 5 1/2" x 1 1/2" thick boards to 27" length and drilled Pocket holes in each end of each board and attached them to the leg centers
.JPG)

Then I primed and painted them an Off White

Next for the seat and once again using recycled scrap wood I took TWO 5 1/2" x 1 1/2" thick and cut them down to 60" .....
I joined them together by drilling pocket holes YES YOU GUESSED IT!!!!
With My KREG JIG♥♥
and then drilled them together using 3" wood screws...
To keep the boards straight at the ends I added a 2" board in the opposite direction..

I then filled in any holes with wood putty and sanded
and then I stained the seat with Early American Stain and then added a clear coat once it had dried for a day....
The Top was attached to the base with screws and WOLLA!!!!
The Bench was Done

So Now that the Table, Bench and Chairs are all done It's Time to decorate the Room..

I have to warn you though
~I'M NOT A DECORATOR~
But I play one in my home LOL!
~I'M NOT A DECORATOR~
But I play one in my home LOL!
So Here We Go!
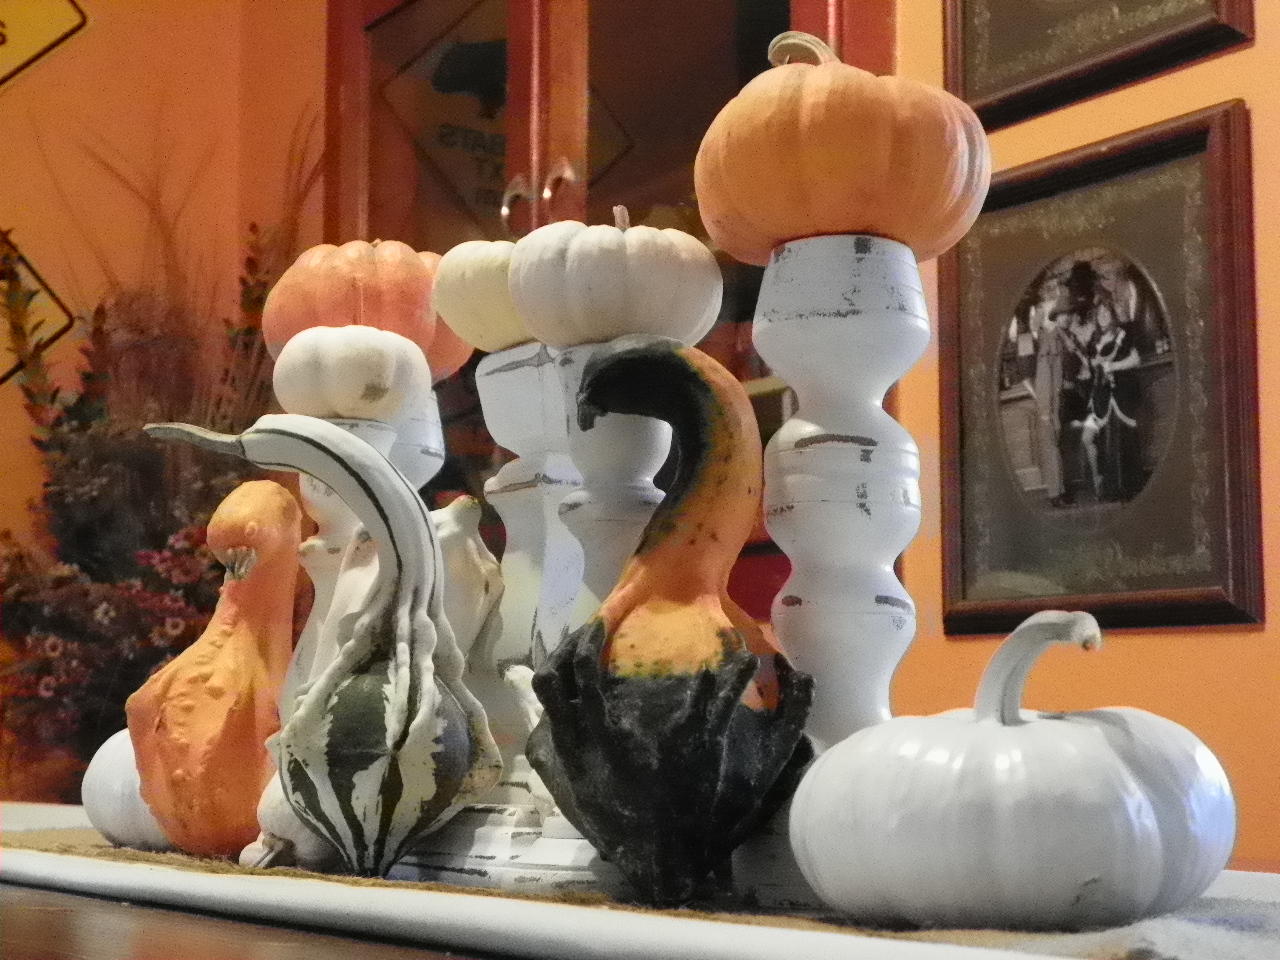
I started with some 25 cent Candle holders that I picked up at the local resale store and some scrap pieces of 1 1/2" thick wood that I cut into 2" x 2" squares
I Primed and painted all the pieces an Off White..
Then with the candle holders all I did was sand some of the white paint off to show the wood color in places..

Then I added some Cool Gourds and Pumpkins and TADA!!
~A COOL CENTER PIECE!~

I then went and made the letters on my Silhouette
and Cut them out on Black Vinyl

Before sticking the Letters on the blocks I sanded around the edge of each block.
Once all the letters were on I used some of the Early American stain and rubbed it over the entire block and wiped off the excess to give it an aged look..

I then sprayed it with a clear coat and let dry..
DON'T THEY LOOK PRETTY??

I had this Base to a singer sewing machine in the basement and thought it would make an awesome table base so I painted it Off White and made a top out of a piece of Birch that I had left over from another Project I worked on.. I gave it a coat of stain and Clear coat and it fits PERFECT right in this little corner of the room
HMMMM! That Empty Glass container Needs some CANDY CORN!
I will put that on my list for the Grocery Store..:)


I had this BELIEVE sign that I had cut out with my scroll saw from another piece of wood I had and gave it a coat of Off White paint.. then added some gourds a pumpkin and Candle holder I had left over to finish this area off.

An extra Chair to sit while talking on the Telephone!
Well the sitting part is TRUE!
PHONE is just for looks..:)

And the Finished Room!

All ready to be filled with Family I am Very Thankful To Have

HAPPY THANKSGIVING!!
EVERYONE.
I am thankful you all Came to Visit
Please feel free to leave a comment on your way out
I read EVERY COMMENT YOU LEAVE..:)
CHEERS!
