Thursday, July 26, 2012

Table made from re-cycled wood

So I have all this re-cycled wood lying around in my garage that I've been meaning to do something with for a while now.
Some from my hubby bringing scraps of wood home from work.
Some from a friend that gets old pallet wood all the time from his work,
and not to mention the old wood floor that someone tore out of a old home and was throwing away
What a Score!
When I saw the wood floor I immediately thought that this would make an awesome table top
So I put my thinking cap on and this is what I came up with.

A CUTE LITTLE SOFA/HALL TABLE!

This is where I got my inspiration from 
My World of Products Catalog:
AND
This is how I made it!
  I selected some of the good pieces of pallet wood that didn't have all the knot holes and rough edges and drew out my design that I wanted for the front of the sofa table and laid my decorative scroll piece on top so I got the right curves that I needed.
See how it fits just nicely on the curve.:)

I then found these decorative legs from an old square table I was going to refinish one day just haven't got around to it yet LOL! they looked almost the same as my inspirational pic so I thought they would be a great template for the legs for this table.
I used some scrap pieces of 2x6 pine that my Husband had bought home from work and laid the legs on top and traced the pattern out.
I Then Cut them all out with my Jig Saw and sanded them down with my orbital sander.
Once I had the frame and legs cut out I used Glue and screws and put the frame together. I decided that I wanted to add a shelf at the bottom and since I still had quite a bit of the smaller pieces of pallet wood left I decided to use them as a shelf.
The smaller pieces weren't in great shape on the edges so on most of them I had to cut the edges off so since they weren't all the same width I decided on the Larger pieces on the outside and getting smaller as it got to the middle...
I love how it came out.
After getting the base all done and sanded I then needed a top and I had the perfect solution, 
The Old wood floor that we scored from someone doing some renovations and they were throwing it away..:)
It need a lot of TLC but after sanding on it for a while it came out beautiful.


I then Painted the base black and gave it a slight distressed look and Stained the top with an Early American stain from Minwax.
AND HERE IT IS All FINISHED!


Cost of this...
Wood: Free
The paint, Stain, screws and glue I already had I just had to Buy some extra sandpaper
and the decorative design on the front which cost me $5.00
My Inspirational Table
$99.00 Retail

I ♥ my Table
Hope you enjoyed my Tutorial
Cheers!

signature

Friday, July 20, 2012

NO DRAWERS IN MY DRAWER! wall cabinet

So I had all these drawers lying around from an old waterbed frame compliments from my neighbor who had purchase a new bed and wanted to know if I would like to use the wood and drawers for any of my projects...and me the JUNK Queen never passes up on an opportunity for free wood LOL!
So I thought to myself, SELF... what can I make out of these drawers?
Then I got to thinking that I was needing a new cabinet to go over the toilet in the bathroom to hold the toilet paper and other bathroom accessories.
So from one of the drawers this is what I made...

A CABINET TO GO OVER THE TOILET


HERE IS HOW I DID IT.... 

First I started with a drawer that I acquired from my neighbor who was throwing away her old water bed frame that had drawers in it and some window shutters that I picked up from a garage sale that were just the right dimensions for this project.


Then I framed out the front of the drawer and added a shelf to the center


I made the dimensions of the frame so that the doors could be mounted on the outside.
I prefer this look rather than the flush look, I think it adds more character to the cabinet,
plus I already had the hinges that mounted this way...:)


I filled all the holes with wood putty as you can see no more handle on top.
If you wanted to keep the handle on top to keep the character of the drawer you can do so,
but I prefer not to.


I then primed and painted the entire shelf with some white paint that I already had
and let it dry....


Once it had dried I took my orbital sander and sanded it to give it the distressed look that I was looking for...


I then took some stain, which I used an early american stain and a brush and smeared it all over the surfaces that I sanded off ...you don't have to be real neat in this part as you can see LOL! 


I then got a rag and wiped off the excess to get the color that I was looking for.
And then I used a spray clear coat over the entire cabinet to seal it and stop the stain from rubbing off.


I then added the hinges and hung,.... ready for all my bathroom accessories..:)


AND HERE IT IS....


Hope you enjoyed my drawer tutorial.
Cheers! 
and feel free to comment, I'd love to hear what you think♥...:)

signature

This Blog Was Featured On
 2crafty4myskirt

Thursday, July 19, 2012

A 10Ft Church Pew Re-Do

I am always up for challenges and the designing side of my brain NEVER STOPS!
So when I was visiting my friend Libby's we were sitting outside on her porch enjoying having GIRL TALK sipping on our ice teas and watching my Girls and her Boys play in the back yard. When conversation came up about she was trying to come up with a shoe rack to go just inside the back door, She had one there already, A tall metal rack frame that had cream canvas bins that slide into it... It was kinda leaning sideways LOL!
So when she told me this the designer side of my brain started going crazy throwing all kinds of ideas out, BUT then I looked over at this OLD Weathered 10 foot church pew that had been sitting out on her porch and was starting to get water logged, a LIGHT BULB!! went off in my head
Hey Libby I said! How about that pew
She looked at me and said Tania that's way too big to go inside my house that is why it is sitting out here.
But Libby what if I cut it in half and make 2 new sides and I make 2 benches out of one and then I'll add a shelf to the bottom and you can put those canvas bins on the shelf to store all the shoes...
LIBBY: Brilliant idea Tania now get to it LOL!

SO HERE IS WHAT I DID
Her other bench looks just like this one...Duh! But per request Libby wanted no shelf on the bottom of the other one she just wanted it without so she could decorate underneath...
Her Sister-In-Law loved this so much that she also had the same pew that they had purchased from the same person and wanted me to make one for her Mom in BLACK and wanted one in White for her daughters room.....
SO THIS IS HOW I DID IT!

First I took the whole pew apart.... Now what a challenge that was cause It had a ton of nails and lots of screws that were hidden by wood filler that I didn't notice until I had busted up about 4 of my knuckles trying to pry it apart...
 Then I cut the boards in half and because of the notches on each end of the boards I had to retrace them on the fresh cut end since I was making 2
These are the sides which I traced around onto a piece of birch and cut them out with my trusty JIGSAW cause I also needed 2 more side to make the other bench....
Once I got all the pieces cut I sanded and then sanded some more and then some more ...Well you get the idea... Oh don't forget to wear your masks when doing this so that you are not breathing in all those dust particles..:)
So once I finished sanding I attached the back to the sides..
But I ran into a problem cause I did realize that by cutting the board in half that the center of the pew was warped from all the use over the years... So as you see in this next picture I had to go through the process of  clamping ,wetting the wood, and heating...repeat ...repeat ...repeat...

 ALMOST THERE!
AND JUST A LITTLE MORE!
Once I got the curve straightened in the wood I started to put the rest of it together
 SO HERE IT IS 2 BENCHES MADE FROM ONE 10 FOOT PEW

I then added a shelf to the bottom of each and primed them


One with white primer and one with grey primer since I was painting one WHITE and the other BLACK

HERE THEY ARE PAINTED........

And this Is what Crystal has done with the white one...
How CUTE with all the bright colors and I bet her daughter loves it...;)


HOPE you  enjoyed my tutorial, feel free to comment...
Thanks for visiting
CHEERS!


signature

Thursday, July 12, 2012

CUT OFF JEAN SHORTS

So My project of the day was To make my daughters some shorts.... They came to me this morning and said Mum I just love these Jean Shorts Can you buy me some more... Well I thought to myself SELF these girls have so many clothes already why should I go and Buy them More.... So I Put My thinking Cap On and Remember a post I had Pinned on Pinterest a while ago so I serched back through my boards and Clicked on this Link by Secrets of a Super Mommy ....


HERE IS WHAT I MADE

First I Found an old pair of jeans that the girls had  blown out the knees in and I knew that by the winter they would be too short for them anyways cause they are growing like little weeds

Then I cut them off to shorts length....

Then I went through my Piles and Piles of Lace that I had sitting around and I had purchased for $5 for the whole box load at a local garage sale... I don't normally go to garage sales But I may have to start cause I really scored at this one..:)...and once I had found the right Lace that I wanted I attached it with Pins as you can see in the picture...

Once it was all pinned I then Sewed it to the bottom of the shorts legs, removed the pins and WOLLA! My Girls have a new Stylish pair of jeans to wear for this summer.... And the Total cost of these Shorts $0....


My Daughter Jessie had first dibs on this pair so now I need to get to making the other daughter a pair... The great thing about it is that they can both wear this pair since they are twins and the same size... A bonus  for me.... I'm Thinking also the next time I make a pair of shorts for them since this was so easy to do, I may add some material Patches to them or I may even cut some holes in them and Put the colorful Patches on the inside since it is all the rage right now...
Cheers! I hope you enjoyed this as much as I did Making them and seeing that Smile on there face when they were done.:)
Photobucket

Wednesday, July 11, 2012

How to make adorable accessories from DUCT TAPE

So Today I was Surfing the Internet on one of My favorite sites ever  Pinterest and I happened to come across a picture That caught my eye because of it's vibrant colors... and I just couldn't resist but click on it.... Thought I would Share this blog with you all from ( Click Here: ) @ The Houseofhepworths Hope you enjoy as much as I did..:) CHEERS!

Photobucket

Sunday, July 8, 2012

Kitchen Re-do on a Budget


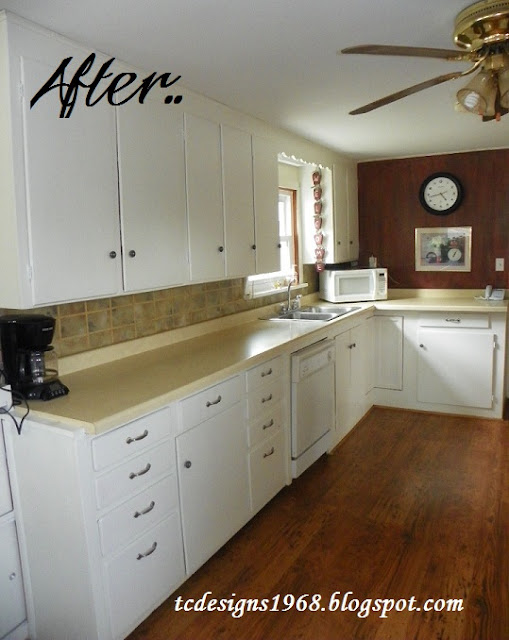
For those of you who are working on a budget and just want to make your kitchen look some what Nice for now until you can afford that dream Kitchen you have always been wanting ...I have a simple solution..PAINT!
My Husband and I plan on redoing our kitchen in a few years and I mean a major renovation but I just got tired of looking at those ugly blue and white cabinets


I Tried to fix it by changing up the color and Painting the doors a light cream color....


I then change my mind once again and needed some more color so I change the frame of the 
cabinets to a Yellow ...at this stage I think my Husband thought I was Crazy LOL! But I just love COLOR.... 


I even thought I would Get creative and Paint an Apple Mural on the wall since My Kitchen theme was APPLES 


My Kitchen Stayed like this for a while and then one day ..Yes You guessed it..LOL! I decided that I didn't like the Yellow anymore and the horrid White ceramic tile that half of them where missing as you can see in this picture.... 


So This is what I did when my Husband went out of town to a baseball game I decided to go WHITE and got rid of that Apple mural and went with a Red Barn wood look on the one wall...  and a tan color on the rest of the walls.


I then added the drawer and cabinet hardware... 
I went with Brushed Nickle Handles for all the Drawers and Grey with nickle centers on the knobs. 


The Tile on the Back slash is Paint.....since we are going to redo the kitchen in a few years I didn't want to have to rip down Ceramic So I came up with this idea... Why not just paint it on there for now... and it was so much cheaper because I used  Left over paint that I had left over from other projects so it didn't cost me any money at all... My Kind of Makeover ..:)


When My Husband Came Home He was shocked and I actually fooled him with the tile back splash he thought it was real tile...I since have done my sister-in-laws kitchen and she loves hers too..:)


Here is how I did the Back Slash
at my Sister-in-Laws

STEP 1....
Prime and Paint the Back Splash the color that you want the Grout color to be and let it Dry completely... Once it is Dry Get some BLUE Painters Tape ...( I used about a 1/4 inch thick tape ) and Lay out your design on the wall...I used straight lines on my own wall and I used the Brick like style on My Sister-in-Laws wall shown below....


STEP 2....
Once you have your design layed out it's time for the paint... I wanted it to look like Slate Tile so I used 3 to 4 different colors to get the affect I was looking for... I used paper plates to pour a little of each color onto. I then Used a worn out paint brush that was thick and matted on the end and a sea sponge and dabbed away all over the entire surface of the wall covering the painters tape, until I got the desired look I needed for it to look like slate...


STEP 3....
Before your paint dries completely, remove the painters tape... The reason I don't let the paint dry fully is because I found that some of the paint will pull away with the tape... But never fear if this does happen it can be touched up later....
As You can see I Cheated a little on a step and didn't Tape off the bottom of the cabinets so as I was going crazy with all the paint dabbing I kinda got a little on the trim of the Cabinets... But it was all OK cause I had plenty of white paint left to touch it up...OOOOPS!


After this step has dried I mixed a color that was just a little darker than the grout color  and used a small detail brush to give the grout a shadowed look so it actually looks like the grout is sunken in and makes the tiles pop out to give it a more realistic appearance...


I let the wall Dry for a day and then the next day went over the entire surface with a clear coat to seal the surface so it could be wiped down and cleaned...
And there you have it Your brand new tiled Back Splash all done with paint...


I forgot to take some Before picks of what it looked like but I was going through some old pics and found this one of the cabinets and what they looked like before I primed and painted them...
Here They Are!


.... It looks so much better now Don't you think?

Hope You enjoyed My Tutorial and please feel free to comment.. Happy Tiling... OOOPS! I meant Happy Painting LOL! CHEERS!


Photobucket

Tip Junkie handmade projects